Building a Chat App with Elixir and Phoenix Presence
Elixir’s Phoenix framework is an ideal choice for building real-time applications, of which chat is just a simple example. And with Phoenix’s 1.2 release and the Presence module for tracking who or what’s online across a cluster, Phoenix is an even better choice for such an application.
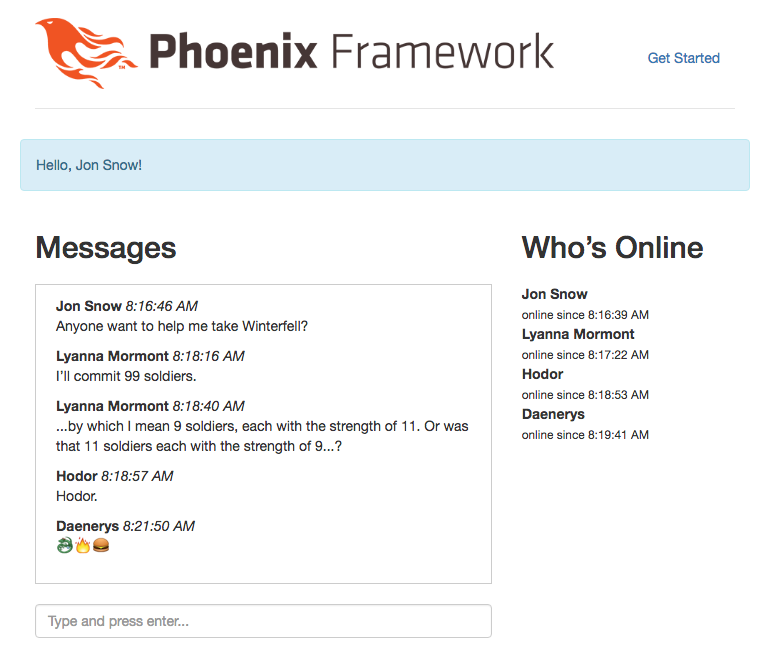
In the tutorial, we’ll use Elixir and Phoenix to build a chat app with two major features: a list of all users who are currently online and when they signed on, and of course the ability for online users to post messages to each other which update live. What we won’t worry about in this first post is authentication (registering and signing in) or persistence (saving messages so they’re there when you come back). I plan on tackling those in a later post, but for now let’s focus on the real-time aspects. Here’s what it will look like:
Installation and Setup
This tutorial will assume the following language and framework versions:
- Erlang 18.3
- Elixir 1.3
- Phoenix 1.2
If you need to install Erlang and Elixir, I recommend the Elixir docs as a great reference. Mac users with Homebrew can just run
$ brew install erlang elixir
To install Phoenix and its dependencies, Node.js and PostgreSQL, follow the Phoenix installation docs. Once you’re able to install Phoenix with
$ mix archive.install https://github.com/phoenixframework/archives/raw/master/phoenix_new.ez
you should be ready to proceed.
Create New Phoenix App
It lacks a bit of imagination (feel free to rename), but I’ll call our app “Phoenix Chat,” and create it with
$ mix phoenix.new phoenix_chat
When asked “Fetch and install dependencies?” enter “Y”. Finally, when the new app is generated, you should see the following message:
We are all set! Run your Phoenix application:

    $ cd phoenix_chat
    $ mix phoenix.server

Before moving on, configure your database in config/dev.exs and run:

    $ mix ecto.create
That’s what we’ll do, but in a different order to avoid some trouble. First cd phoenix_chat and then run mix ecto.create to create our app’s database. If you get an error like role "postgres" does not exist, you may need to create it first:
$ createuser postgres --login --createdb --pwprompt
(When prompted to enter and confirm a password, enter postgres.) Now mix ecto.create should succeed.
With the database created, run mix phoenix.server. You should see output beginning with [info] Running PhoenixChat.Endpoint and when you visit http://localhost:4000/ in a browser, you should the default “Welcome to Phoenix!” page. We’re up and running with Phoenix!
This default page corresponds to the web/templates/pages/index.html.eex template file (Github). Let’s go ahead and delete everything in that file and replace it with the backbone of our chat app:
<div class="row">
  <div class="col-md-12 alert alert-info">
    Hello, <span id="User"><%= @conn.params["user"] %></span>!
  </div>
  <div class="col-md-8">
    <h2>Messages</h2>
    <input type="text" id="NewMessage" placeholder="Type and press enter..." class="form-control">
    <ul id="MessageList" class="list-unstyled"></ul>
  </div>
  <div  class="col-md-4">
    <h2>Who’s Online</h2>
    <ul id="UserList" class="list-unstyled">
      <li>Loading online users...</li>
    </ul>
  </div>
</div>
This isn’t beautiful markup, but for now it’ll do. Note the embedded Elixir tag, <%= @conn.params["user"] %>. This renders out the name of the user which we’ll access later with JavaScript. Its value will be whatever we put after ?user= in the URL. For example, visit http://localhost:4000/?user=Steve and you should see “Hello, Steve!” at the top of the page. A real app would of course require users to identify themselves with a username and password, but for now we’ll keep things simple.
Tracking Online Users with Phoenix Presence
Of the two major features we want to build, we’ll start with the list of online users. We’ll use Phoenix 1.2’s new Presence module in order to track who’s currently online in our chat room. To set up presence in our app, run the handy generator:
$ mix phoenix.gen.presence
As the output suggests, we also need to add our app’s Presence module to the list of processes our application starts and keeps running. In lib/phoenix_chat.ex, add this line to the list of children:
# lib/phoenix_chat.ex
children = [
  # ...
  supervisor(PhoenixChat.Presence, []),
]
We also need to restart the phoenix.server command in order to start the PhoenixChat.Presence process for the first time. In the terminal window where it’s running, stop the current server process by hitting Ctrl+c twice, then run mix phoenix.server again.
Next, we’ll need to modify the default PhoenixChat.UserSocket module. In a web context, a socket is an open connection between a user’s browser (the “client”) and our app (the “server”). With a typical web app, the client makes an HTTP request (e.g. GET /home) to the server, the server returns a response (e.g. the HTML for the home page), and the connection is closed. A socket allows the client-server connection to remain open so the client and server can continue to exchange messages as long as the user remains on the page.
When a browser opens up a socket connection to our app, the UserSocket’s job is to identify which “user” that is, usually by some means of authentication. Conceptually, this is similar to how a controller in an MVC app identifies and stores the current_user. Since we’re not worrying about authentication yet, we’ll just expect the client to tell us the name of which user they are. When we get to the JavaScript side of things, we’ll connect to the socket basically like this:
socket = new Socket("/socket", {params: {user: "Steve"})
socket.connect()
Thanks to the following line (present by default) in our endpoint module,
# lib/phpenix_chat/endpoint.ex
socket "/socket", PhoenixChat.UserSocket
when our JavaScript connects to the socket Phoenix will send its params to the connect function in our UserSocket module, where we can pattern match on the user and assign it to the socket for reference later on:
# web/channels/user_socket.ex
def connect(%{"user" => user}, socket) do
  {:ok, assign(socket, :user, user)}
end
In the same file, we’ll also need to uncomment line 5, which I’ll explain next:
## Channels
channel "room:*", PhoenixChat.RoomChannel
If the socket is like a radio allowing the client and server to talk to each other, then Phoenix channels are like frequencies. Specifically here, a user has one connection to the server (the socket) but can join and leave many “rooms” (the channel), and will only be able to send and receive messages in channels they’ve connected to. We might have one RoomChannel to handle public chat rooms and a separate DirectMessageChannel to handle private messages between two users. Note that our single RoomChannel module can actually handle as many different “chat rooms” as we need thanks to the wildcard (*) above. We’ll only be dealing with a single room:lobby channel available to all users, though.
Of course, our PhoenixChat.RoomChannel module doesn’t exist yet. Let’s fix that (Github):
defmodule PhoenixChat.RoomChannel do
  use PhoenixChat.Web, :channel
  alias PhoenixChat.Presence

  def join("room:lobby", _, socket) do
    send self(), :after_join
    {:ok, socket}
  end

  def handle_info(:after_join, socket) do
    Presence.track(socket, socket.assigns.user, %{
      online_at: :os.system_time(:milli_seconds)
    })
    push socket, "presence_state", Presence.list(socket)
    {:noreply, socket}
  end
end
Here, our friend Presence makes an important appearance. When we call room.join("room:lobby") in our JavaScript, this module’s after_join function will call Presence.track to start tracking that user’s presence in this room. socket.assigns.user is the user’s name which we stored earlier in the UserSocket’s connect function. And we can attach additional metadata (online_at) such as when the user first joined the room. Of course, when you join, there may already be other users online, so we push the current state of who else is online (Presence.list) back to the user via a "presence_state" event, which we’ll soon handle in the JavaScript.
It’s finally time to write some JavaScript! I’ll cover each section—connecting to the socket, handling Presence events, and joining the lobby room—in turn, but you can see the whole app.js file at this stage on Github.
import "phoenix_html"
import {Socket, Presence} from "phoenix"

let user = document.getElementById("User").innerText
let socket = new Socket("/socket", {params: {user: user}})
socket.connect()
First we have to import the Socket and Presence JavaScript that comes with Phoenix, which we’ll make use of. Remember in the beginning how we rendered the user’s name in a <span> with an id attribute of User? We grab that name here, pass it to a new Socket connection, and connect.
The presence code is a bit more involved, but it mostly has to do with how we display presences in the browser:
let presences = {}

let formatTimestamp = (timestamp) => {
  let date = new Date(timestamp)
  return date.toLocaleTimeString()
}
let listBy = (user, {metas: metas}) => {
  return {
    user: user,
    onlineAt: formatTimestamp(metas[0].online_at)
  }
}

let userList = document.getElementById("UserList")
let render = (presences) => {
  userList.innerHTML = Presence.list(presences, listBy)
    .map(presence => `
      <li>
        ${presence.user}
        <br>
        <small>online since ${presence.onlineAt}</small>
      </li>
    `)
    .join("")
}

// Channels
let room = socket.channel("room:lobby")
room.on("presence_state", state => {
  presences = Presence.syncState(presences, state)
  render(presences)
})

room.on("presence_diff", diff => {
  presences = Presence.syncDiff(presences, diff)
  render(presences)
})

room.join()
formatTimestamp just turns our server-generated timestamps (e.g. :os.system_time(:milli_seconds)) into a format that’s both human-readable and in the browser’s time zone. Presence.list is interesting: a given user can actually have multiple presences (which Phoenix sends as metas). For example, they might be online from a browser as well as a mobile device. So the listBy function’s job is to return a JavaScript object with the user’s name and when they were first detected online. We could do a lot more, but I’ll leave that as an exercise for those interested. Next, the render function updates our list of users to display all online users. We’ll call it whenever a user joins or leaves the room.
Beneath the // Channels comment, we tell the JavaScript about the "room:lobby" channel and join it. We need to handle two events as far as Presence is concerned. "presence_state" is when the server sends us the state of everyone online, which happens when we first connect and if we ever disconnect. We also handle the "presence_diff" event, which the server will send when someone joins or leaves and contains just the difference we need to adjust for. In both cases, Phoenix’s Presence JavaScript has special functions to do the heavy lifting for us: both syncState and syncDiff will set our presences object to the current state of who’s online, which we then render as HTML for display.
That’s it for presence! Before moving on to the chat segment of this tutorial, you can test what we’ve got so far by viewing our chat app as different users, for example opening http://localhost:4000?user=Steve and http://localhost:4000?user=Jane in different browser tabs and watching the “Who’s Online” section of each tab update live.
Setting up Chat
Building the chat functionality turns out to be simpler than displaying who’s online. We’ll be adding just a single function to the RoomChannel module to handle new chat messages, as well as some JavaScript to handle sending and receiving them. We’ll start with the RoomChannel (Github)
# web/channels/room_channel.ex
def handle_in("message:new", message, socket) do
  broadcast! socket, "message:new", %{
    user: socket.assigns.user,
    body: message,
    timestamp: :os.system_time(:milli_seconds)
  }
  {:noreply, socket}
end
All we’re doing here is listening for messages of the type "message:new" (which we’ll send with JavaScript below) and broadcast!-ing them to everyone connected to the current room (including ourselves) after adding some additional metadata like who posted the message and when. Note that users in the chat room aren’t technically talking to each other. Rather, they’re sending messages to our app and our app is sending those messages back out to the other users. This gives us a degree of control that would likely matter more if, for example, our chat app were instead a game server and we wanted to ensure that the messages a user sends—move left, move right, attack—were moves they’re actually allowed to make.
Back in app.js, we have to wire up the <input> to listen for the Enter key (keyCode 13) and use room.push() to send whatever the user’s typed to the server:
// web/static/js/app.js
let messageInput = document.getElementById("NewMessage")
messageInput.addEventListener("keypress", (e) => {
  if (e.keyCode == 13 && messageInput.value != "") {
    room.push("message:new", messageInput.value)
    messageInput.value = ""
  }
})
Upon receiving a message from any user (including the current one), the server will send it back out (with the user’s name and message timestamp as metadata) over the socket as a "message:new" event. We’ll listen for those messages client-side and upon receiving one, build a <li> with the message data and append it to our message list. Finally, we set the messageList.scrollTop to its maximum value (the very bottom) to ensure that new messages are always displayed, pushing older messages up out of immediate view.
let messageList = document.getElementById("MessageList")
let renderMessage = (message) => {
  let messageElement = document.createElement("li")
  messageElement.innerHTML = `
    <b>${message.user}</b>
    <i>${formatTimestamp(message.timestamp)}</i>
    <p>${message.body}</p>
  `
  messageList.appendChild(messageElement)
  messageList.scrollTop = messageList.scrollHeight;
}

room.on("message:new", message => renderMessage(message))
And that’s it! Again, we can test this by opening our app in multiple browser tabs with different ?user= values to simulate multiple users talking to each other in real-time.